Understanding Dental Sealants for Kids and How They Protect Teeth
When children chew, their back teeth take on the heaviest workload. Molars feature intricate biting surfaces filled with tiny microscopic pits and narrow fissures. While these anatomical grooves help grind food, they also create ideal hiding spots for bacteria and microscopic food particles. Even with diligent brushing, toothbrush bristles are often too wide to reach the deepest crevices of these chewing surfaces.
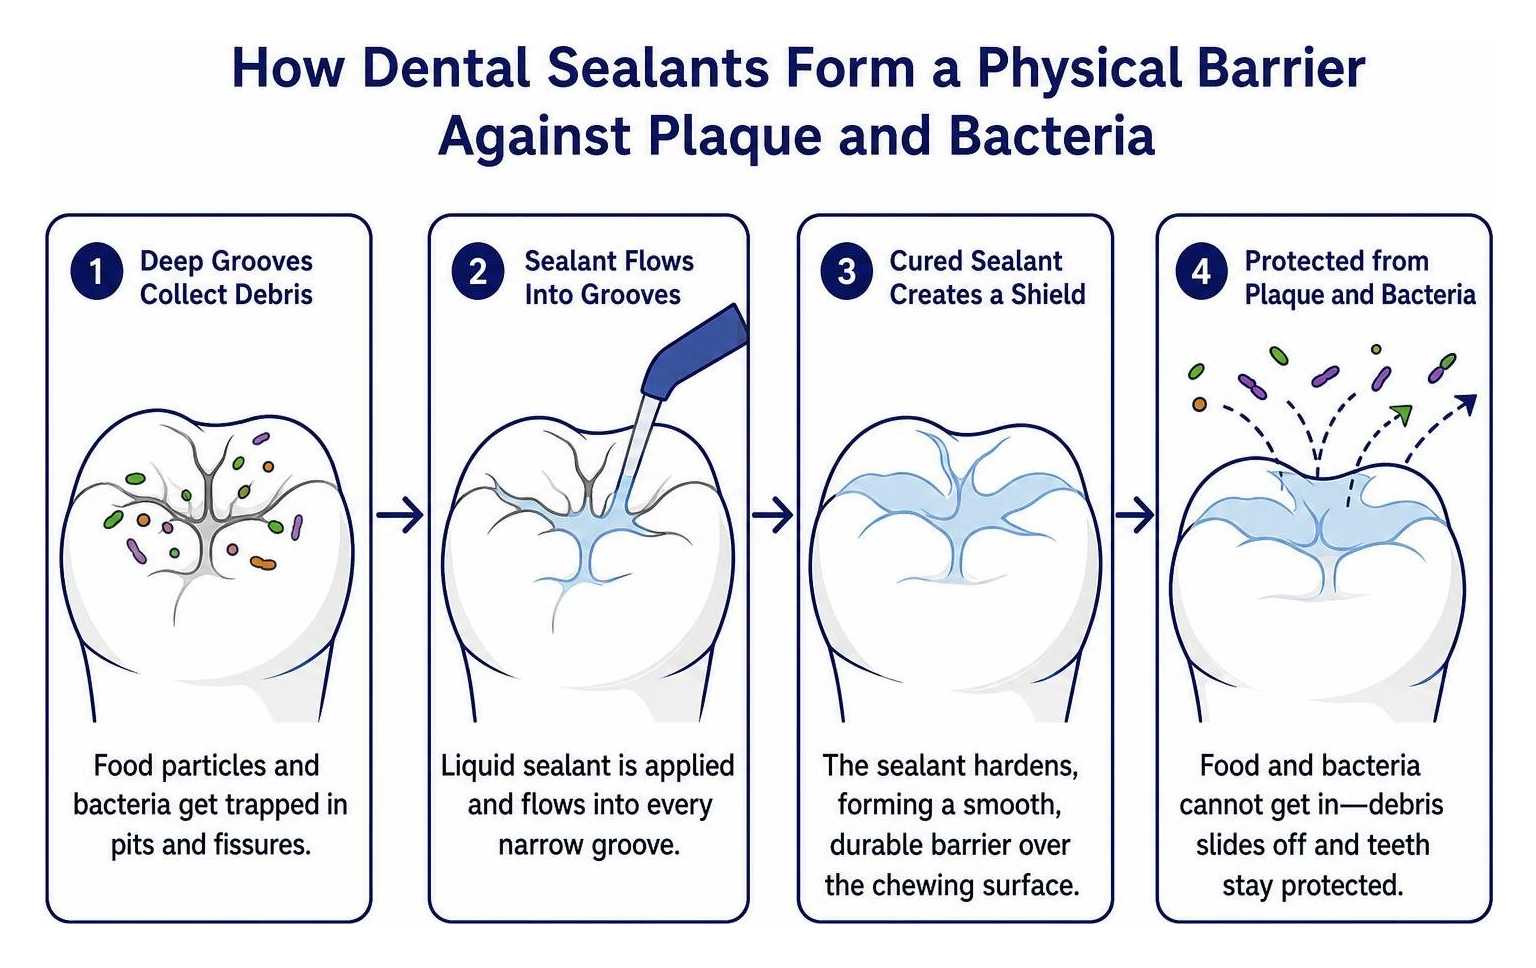
A dental sealant acts as a specialized physical barrier over these vulnerable zones. Applied as a liquid resin or glass-based material, the sealant flows directly into every narrow groove of the tooth enamel. Once cured and hardened, it creates a completely smooth, durable shield across the chewing surface.
Instead of food particles packing down into microscopic ravines where decay begins, they slide right off the sealed surface, making daily oral hygiene dramatically more effective. Incorporating sealants into routine pediatric dentistry provides developing teeth with a reliable layer of defense during a child’s most cavity-prone years.
How Pit and Fissure Sealants Shield Molars
Tooth decay occurs when bacteria living in plaque feed on dietary sugars and produce harmful acids. These acids slowly demineralize tooth enamel, eventually creating a cavity. Because the biting surfaces of back teeth account for the vast majority of childhood cavities, shielding these grooves is essential.
Understanding how dental sealants work helps demystify why they are so protective. You can think of a dental sealant as a durable, custom-fitted raincoat for your child’s molar. By sealing off the deep pits and fissures, the material isolates the vulnerable enamel from oral bacteria and sugar. Without access to trapped food debris, bacteria cannot generate the acid needed to erode the tooth structure.
Ideal Age and Timing for Dental Sealants for Kids
Timing plays an important role in maximizing the protective power of sealants. Dentists recommend placing sealants as soon as a permanent molar fully emerges past the gumline, ensuring the enamel is shielded before decay has a chance to take root.
Children typically experience two major molar eruption windows:
- First Permanent Molars (Ages 5 to 7): These teeth, often called the “six-year molars,” erupt behind the baby teeth without replacing any primary teeth. Applying sealants right away protects them through early childhood.
- Second Permanent Molars (Ages 11 to 14): Often called the “twelve-year molars,” these emerge farther back in the mouth during late childhood and early adolescence.
- Primary (Baby) Molars: In certain cases, if a toddler or young child has baby molars with exceptionally deep grooves or is at high risk for early decay, sealing primary teeth can preserve space for developing adult teeth.
Parents can review government guidelines like the NIDCR Seal Out Tooth Decay Fact Sheet and learn actionable pediatric dental care tips to keep their children on schedule for preventive checkups.
Cavity Prevention Efficacy and Public Health Impact
The clinical evidence supporting dental sealants spans more than five decades. Major epidemiological studies, including National Health and Nutrition Examination Survey (NHANES) data, reveal that 21% of children aged 6 to 11 and 58% of adolescents aged 12 to 19 experience caries lesions in their permanent teeth.
Despite their proven effectiveness, sealants remain underutilized. NHANES data shows that only about 41% of children aged 9 to 11 and 43% of adolescents aged 12 to 19 have at least one dental sealant. Significant health disparities persist across demographics, with non-Hispanic Black children historically having the lowest sealant prevalence rates.
Public health initiatives and leading organizations like the CDC’s Division of Oral Health emphasize that expanding sealant access is one of the most effective ways to close pediatric health gaps. Combining sealants with proven preventive dental care practices establishes a solid foundation for lifelong oral wellness.
Clinical Cavity Reduction Rates
Extensive clinical trials highlighted in the AAPD Evidence-Based Practice Guidelines demonstrate the protective power of pit-and-fissure sealants:
- 80% Cavity Protection for 2 Years: Sealants prevent up to 80% of cavities on chewing surfaces during the initial two years following application.
- 50% Protection for up to 4 Years: Protection remains strong over time, cutting cavity risk in half for up to four years.
- Threefold Risk Reduction: School-aged children without sealants are almost three times more likely to develop molar cavities compared to children with sealed teeth.
- 76% Overall Caries Incidence Reduction: In children and adolescents with sound occlusal surfaces, pit-and-fissure sealants reduce occlusal caries incidence in permanent molars by 76% after 2 to 3 years of follow-up.
For a group of children with a baseline cavity risk of 30%, sealing their molars prevents roughly 207 carious lesions for every 1,000 teeth treated.
Public Health and School-Based Sealant Programs
Beyond private dental practices, school-based sealant programs serve as critical community safety nets. By bringing portable dental equipment directly into schools, registered dental hygienists and dental professionals can screen children and place sealants on-site.
Federal health data shows that applying sealants to the nearly 7 million low-income children who currently lack them could prevent more than 3 million cavities nationwide and save up to $300 million in restorative dental treatment costs. In fact, each sealed tooth saves over $11 in direct dental treatment costs. Public health departments use the CDC’s SEALS tracking system to monitor program efficiency, lower student absenteeism caused by toothaches, and protect young smiles across every community.
Comparing Dental Sealants, Fluoride Varnish, and Material Types
Parents frequently ask whether their child needs sealants if they are already receiving regular topical fluoride treatments. The answer is that both work together synergistically to protect different areas of the tooth structure.
| Feature | Dental Sealants | Fluoride Varnish |
|---|---|---|
| Primary Target | Pits, fissures, and grooves of back molars | Smooth outer enamel surfaces across all teeth |
| Mechanism | Physical resin/glass barrier blocking bacteria | Chemical remineralization strengthening enamel |
| Application Area | Chewing (occlusal) surfaces | Entire surface of every tooth |
| Caries Reduction (Grooves) | Cuts new fissure caries risk by 73% vs fluoride alone | Moderately reduces smooth surface lesions |
| Duration | Lasts years (typically 5 to 10 years with checkups) | Applied every 3 to 6 months at routine visits |
Dental Sealants vs. Fluoride Varnish
Fluoride varnish is exceptionally effective at reinforcing smooth enamel surfaces, remineralizing early microscopic weak spots, and resisting acid across the front, sides, and backs of teeth. However, fluoride alone has limitations when it comes to deep, narrow anatomical fissures.
Clinical research endorsed by the American Dental Association’s Oral Health Topics confirms that sealants reduce the risk of developing new pit-and-fissure caries lesions by 73% compared to fluoride varnishes alone. Using sealants on chewing surfaces alongside regular topical fluoride delivers complete 360-degree protection for your child’s teeth.
Types of Sealant Materials
Dentists use a few different sealant materials depending on clinical needs and moisture control during placement:
- Resin-Based Composites: The most common sealant material. Resin sealants offer exceptional bond strength and wear resistance. They require a completely dry tooth surface during placement to achieve optimal bonding.
- Glass Ionomer (GI) Cements: These materials form a chemical bond with enamel and continuously release fluoride into the surrounding tooth structure. Because they tolerate moisture better than resin, they are ideal for partially erupted molars where strict isolation from saliva is difficult.
- Resin-Modified Glass Ionomers (RMGI): A hybrid option combining the moisture tolerance and fluoride release of glass ionomer with the enhanced strength and durability of resin.
- Polyacid-Modified Resins (Compomers): Another hybrid formulation that offers good physical strength with mild fluoride-releasing capabilities.
According to the Joint ADA/AAPD Clinical Practice Guideline, all four material classes are clinically effective. Your dentist will choose the best material based on your child’s unique anatomy and how easily the tooth can be kept dry during the procedure.
Application Procedure, Safety, and Long-Term Maintenance
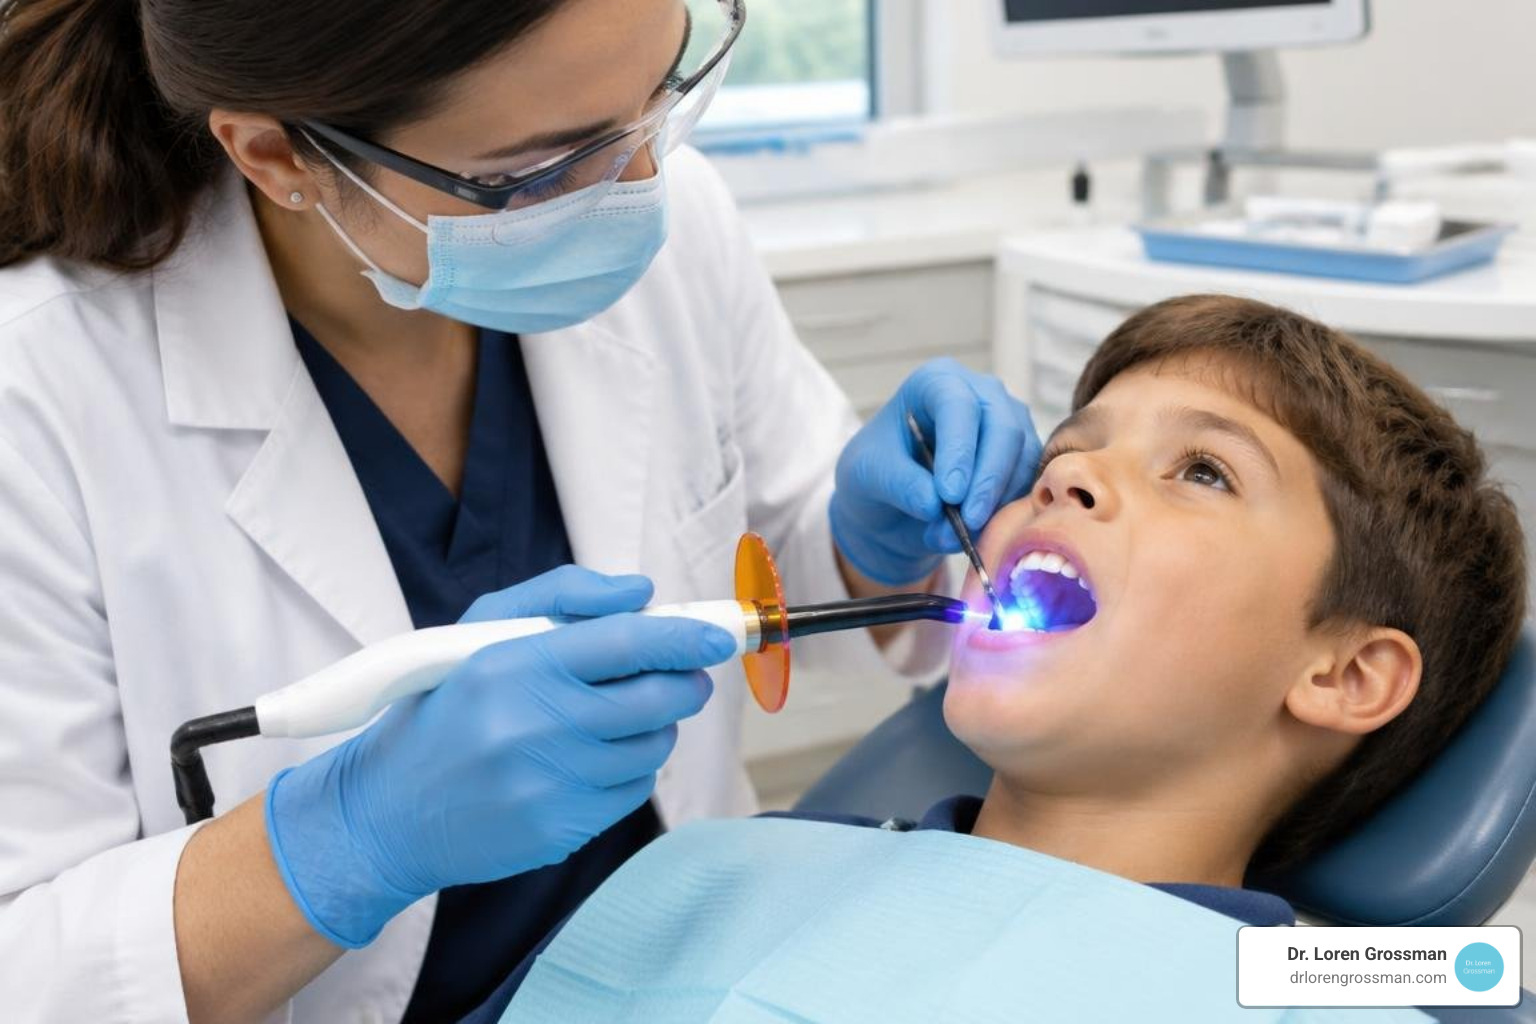
One of the greatest benefits of dental sealants is that the application process is completely non-invasive, quick, and painless. It involves no drilling, no shots, and no removal of natural tooth structure. For anxious young patients, getting sealants placed serves as an easy, positive introduction to preventive dental visits, reinforcing principles from our guide to lifelong family oral health.
Step-by-Step Application Process
Placing a sealant on a molar takes only a few minutes per tooth:
- Tooth Polishing: The dental team cleans the chewing surface thoroughly using a rotating brush and pumice to clear away plaque and food debris.
- Isolation and Drying: Cotton rolls or a small dental dam isolate the molar, keeping it dry and protected from saliva.
- Acid Etching: A mild, gel-based etching solution is applied to the grooves for roughly 15 to 20 seconds. This creates microscopic surface textures that allow the sealant material to bond securely.
- Rinse and Dry: The etching gel is rinsed away thoroughly with water, and the tooth is dried with clean air.
- Liquid Application: The liquid sealant material is painted directly into the deep pits and fissures using a fine applicator tip.
- Light Curing: A specialized blue curing light is held over the tooth for 20 to 30 seconds, instantly hardening the material into a solid plastic shield.
- Bite Check and Surface Rinse: The dentist checks the child’s bite to ensure comfort, rinses the surface with an air-water syringe for 30 seconds, and has older children rinse to clear any residual material.
Safety, BPA Concerns, and Material Durability
Parents sometimes express concern regarding potential Bisphenol A (BPA) exposure from resin dental materials. It is important to know that BPA is not an active ingredient in dental sealants. Trace levels of BPA derivatives that might be detected immediately after placement are measured in parts per billion—substantially less than the background levels a person encounters simply by handling a paper store receipt.
Washing the cured sealant with an air-water syringe for 30 seconds removes any unpolymerized surface layer, eliminating trace residue and keeping exposure negligible. Both the FDA and ADA confirm that sealants are safe for children.
Sealants generally last between 5 and 10 years. Over time, normal chewing forces, ice crunching, or sticky snacks can cause minor edge wear. Attending regular dental check-ups allows your dental team to examine sealed teeth at every visit and touch up any worn spots in seconds.
Insurance, Medicaid, and Cost of Dental Sealants for Kids
Because sealants are proven to prevent expensive restorations down the road, almost all private dental insurance plans cover sealant application (billed under Current Dental Terminology code CDT 1351) for children on permanent molars up to ages 14 or 16.
Furthermore, state Medicaid programs and Children’s Health Insurance Programs (CHIP) cover sealants as standard preventive care. Families exploring coverage details can review our guide on pediatric dentistry Medicaid options to ensure their children receive preventive benefits without unexpected out-of-pocket costs.
Frequently Asked Questions About Pediatric Dental Sealants
Do dental sealants hurt during application?
Not at all. Sealant application is completely painless and non-invasive. There are no injections, no local anesthetics, and zero drilling or removal of healthy tooth structure. Children simply sit back, keep their mouths open, and feel a gentle brush and light on their teeth.
What happens if a sealant is placed over early decay?
If a molar has an early, non-cavitated enamel lesion (a microscopic weak spot without an open hole), sealing the tooth is actually beneficial. The sealant locks out the bacteria’s supply of sugar and oxygen, halting the progression of the decay and allowing the underlying enamel to stabilize. Your dentist will evaluate the tooth with visual exams and digital X-rays to ensure the lesion is suitable for sealing.
Do kids need special dietary restrictions after getting sealants?
No prolonged waiting period is needed! Because the curing light hardens the sealant instantly, children can eat and drink right after their appointment. However, to keep sealants intact for years, children should avoid chewing on hard ice cubes, hard candy, or excessively sticky foods like taffy. Routine twice-daily brushing with fluoride toothpaste and daily flossing remain essential for whole-mouth protection.
Conclusion
Guiding your child toward lifelong oral health means combining consistent daily brushing and flossing with proactive clinical prevention. Applying dental sealants to newly erupted molars provides an invisible, durable layer of protection against cavities during the most vulnerable developmental years.
At our Kingston practice, Dr. Loren Grossman and our dedicated dental team provide compassionate, patient-centered care utilizing modern techniques and gentle methods. Whether your child needs their six-year molars evaluated or you are looking for comprehensive oral care for the whole family, explore our comprehensive dental care services today to protect and brighten your child’s smile.